Image2HTML
15 Nov 2005
I’ve had this idea for some time. I want to convert an image into text such that each letter corresponds to one pixel, the letter chosen being based on the color value of that pixel. I also want to colorize each letter.
I started out by hand to test my idea, converting a sample image to RAW format with a graphic application to avoid any trouble with compression methods. Saving the picture in grayscale, I could easily detect the patterns in the image when I opened the file in a text editor. Each letter corresponds to one pixel and is based on the hex value for the grayscale.
After thinking about how to colorize the text, I decided that a combination of Perl and ImageMagick would be the better choice. I have used ImageMagick before, as part of wsGallery and for quick conversion between image formats. HTML appeared to be the easiest way to colorize text. RTF is a pain to code by hand.
I’ve automated the process somewhat to output an html file from the input image with correct colors. Here’s a run down of the script:
@args = ("/usr/local/bin/convert", "$ARGV[0]", "$ARGV[0].txt");
system(@args);
Running the image trough ImageMagicks convert command converts the image to a textfile with each line representing the value of a pixel like this:
# ImageMagick pixel enumeration: 120,120,255,RGB
0,0: (196,194,173) #C4C2AD
1,0: (199,197,176) #C7C5B0
2,0: (203,201,180) #CBC9B4
3,0: (205,203,182) #CDCBB6
4,0: (208,206,185) #D0CEB9
5,0: (209,207,186) #D1CFBA
6,0: (211,209,188) #D3D1BC
7,0: (213,211,190) #D5D3BE
8,0: (213,210,191) #D5D2BF
[...]
Next, we open up (or rather create) the output html file and output some initial html tags:
open(OUT, ">$ARGV[1]");
print OUT "<html>
<head>
  <style>
    body {
      background-color:#000000;
      font-family:Monaco;
      font-size:9px;
      line-height:0.5em;
      font-width:font-weight;
    }
    b {
      font-weight:normal;
    }
  </style>
</head>
<body>";
Monaco works best as it is a mono-spaced font. Other choices would be Courier New and Andale Mono. Also note the line-height is set very low to ensure close to square character blocks. Otherwise the image would be stretched. I chose a font-size of 9px so that I would still be able to read the letters. The style for bold is set to normal font weight. I use <b> as the coloring tag to save space (the original implementation used <span>. The new tag takes up 16% less space per pixel).
open(COLOR,$ARGV[0].".txt");
my $count=0;
$tmp = <COLOR>;
$tmp =~ /: ([0-9]{1,})/;
$width = $1;
As my Perl skills are not very Jedi-like, the above lines are a clumsy way of finding the width of the image. Note that the first line in the ImageMagick output contains the number 120 twice. That’s the width and height. We also initialize a counter to keep track of where we are on a line.
while(<COLOR>) {
  my $n=/\( {0,2}([0-9]{1,3}), {0,2}([0-9]{1,3})?,
    {0,2}([0-9]{1,3})?\)/;
  if($n) {
    my $c=($1+$2+$3)/3;
    printf OUT ("<b style=\"color:#%2.2X%2.2X%2.2X;\">",
      $1,$2,$3);
    my $p = encode_entities(chr($c%57+65));
    print OUT $p;

    print OUT "</b>";
    $count+=1;
    if($count>=$width) {
      print OUT "<br />";
      $count=0;
    }
  }
}
This is were all the fun goes on. We loop through the file one line at a time, setting $1, $2 and $3 to the RGB values for each pixel using clever regular expressions. $c is then set to the average of the three, my attempt at finding a grayscale value for the current pixel. The found color is then printed as a <span> with corresponding style. A shorter tag could bring the filesize down considerably. The character is found by mapping the grayscale value (modulo 57)+65 to the ascii table. This gives us characters between 65 and 122 which is characters A to z.
print OUT "</body>;
</html>";
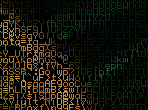
Finally we close the html document. The code is a quick hack but it works. I have uploaded three images from the desktop section and their resulting html (~400KB each!).
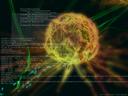
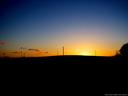

Stepping back from the monitor, one can easily see the resemblance to the original image. It is also very clear that a quite hefty enlargement takes place as each letter is much bigger than the pixels and that this is an extremely inefficient way to draw an image :)
Actually, the image becomes much more clear in closeup, if we output the same letter, say an o, nice and round, over and over: overlays3-o. This is, however, not nearly as interesting to look at.
I plan on refining the choice of letters and then have a suitable image converted and printed as a poster for my wall.